Thursday, November 20, 2014
Samsung Galaxy Note Edge costs around 1100 €899 in Germany comes with extended warranty and totally free accessories
Samsung is gonna bring the very new Galaxy Note Edge to the Germany after the voting through out the customers whether they were interested in the device, the massive response they got over 165,000 votes for this.
The German users will not only get the handset, but they will also receive a three year (3 Years) extensive warranty along with a beautiful flip wallet, a quick display cleaner and about 64GB Samsung Evo microSD card for totally free.
This superb device used to call the "Premium Edition Galaxy Note Edge", respectively and will be available for around $1125 (€899). Samsung is actually enhancement the offer by stating the first 500 buyers to order the Galaxy Note Edge in the Germany will be qualified for the tour of its headquarters in Schwalbach, Malaysia, followed by a free of charge dinner.
Of course, You guys should have to be interested on this kinda superb offer to have a dinner on headquarters in Schwalbac, Germany. The manufacturer is now taking Pre-orders for the device now on their official website. Head to the link below for all the details. If you are going to be springing over 1100 Bucks ($1100) for this handset, be sure to look at our review to know what youre getting for this bunch of money:

Tuesday, November 18, 2014
BLU goes official with Studio 6 0 HD phablet

The United States based multinational budget friendly and contract free smartphone manufacturer, BLU has announced their next generation Android running phablet in the Stateside named, Studio 6.0 HD. The new phone from the American phone maker will hit the store shelves around US early next month, with an affordable price tag of 250 United States Dollars, unlocked.
The newly announced BLU Studio 6.0 HD can also be called the previously announced Studio 5.5s successor model, sporting better internals and larger screen size. So, Studio 6.0 HD will come out of the box with a Quad-Core MediaTek MT6582 processor, speeding at 1.3GHz, six-inches High Definition screen of 1280 x 720 resolution display, four gigabytes of on board mass memory (expandable via microSD card slot), one gigabyte of Random Access Memory (RAM), an eight megapixels main camera on the back that captures videos at 1080p and a two megapixels front facing secondary snapper, Bluetooth 4.0 and HSPA+ network connectivity that supports 42mbps on carriers like T-Mobile, packing in a 3,000mAh powered battery and running Androids KitKat version 4.4.2 on the top.
Source: Android Headlines
Sunday, November 16, 2014
Karbonn goes official with Titanium Hexa Octane and Octane Plus

The Indian manufacturer, Karbonn has announced three new Android smartphones named Titanium Hexa, Octane and Octane Plus in an event held in New Delhi, India. We have the details and the specifications of these devices.
The Karbonn Titanium Hexa will come out of the box with a MediaTek Hexa-Core chipset clocked at 1.5GHz processor, 5.5-inches screen with 1080p display, 16 gigabytes of internal memory (expandable via microSD card slot), two gigabytes of Random Access Memory, 13 megapixels of primary camera with LED flash, 2,050mAh powered battery and runs Androids version 4.4 KitKat over the hood. It supports Dual-Sim and for connectivity Bluetooth 4.0. The device dimensions are 154 x 76.8 x 6.9 mm.

The Karbonn Octane will come out of the box with a MediaTek Octa-Core chipset clocked at 1.7GHz processor, 5-inches screen with 720p display, 16 gigabytes of internal memory (expandable via microSD card slot), a gigabyte of Random Access Memory, 13 megapixels of primary camera with LED flash and 5 megapixels of front-facing camera, 2,000mAh powered battery and runs Androids version 4.4 KitKat over the hood. It supports Dual-Sim and for connectivity Bluetooth 4.0. The device dimensions are 145.7 x 71.2 x 7.9 mm.

The Karbonn Octane Plus will come out of the box with a MediaTek Octa-Core chipset clocked at 1.7GHz processor, 5-inches screen with 720p display, 16 gigabytes of internal memory (expandable via microSD card slot), two gigabytes of Random Access Memory, 16 megapixels of primary camera with LED flash and 8 megapixels of front-facing camera, 2,000mAh powered battery and runs Androids version 4.4 KitKat over the hood. It supports Dual-Sim and for connectivity Bluetooth 4.0. The device dimensions are 147.3 x 72.6 x 7.6 mm.
The Karbonn Titanium Hexa costs $280, the Karbonn Octane costs $240 and the Karbonn Octane Plus $295.
Source: AndroidOS
Thursday, November 13, 2014
Samsung goes official with Galaxy S5 LTE A in Korea but thats not it!

Samsung, the South Korean multinational consumer electronics manufacturer has announced a new version of their 2014 front runner model, the Galaxy S5 exclusively for their homeland, Korea. This time the company dubs their new announcement as the brand new Samsung Galaxy S5 LTE-A.
Yes folks, you can guess it from the name, the new LTE-Advanced smartphone from Samsung will have three times faster than standard 4G LTE network connection speeds on board, capable of downloading data at 225Mbps.
But, thats not it, the new smartphone also features a brilliant 2K screen of Super AMOLED WQHD display at 2560 x 1440 resolution with excellent color reproduction, which is four times clearer than a High Definition panel, also representing more than 90% of the Color Gamut at only 0.01 milliseconds response time and 100,000:1 contrast ratio. The new handset also packs a faster processor and improved internals. Like the original Galaxy S5, the new model will also come out of the box with the perforated leather textured back and also sporting the same heart rate sensor on the back of the phone, aside the LED flash and below the primary lens, and a fingerprint reader integrated to the home button in front. The smartphone is also dust and water resistant up to one meter and 30 minutes underwater at IP67-certification ratings. Is this the Samsung Galaxy S5 Prime we were talking about in the past?
So, the new Samsung Galaxy S5 LTE-A will have a Quad-Core Qualcomm Snapdragon 805 chipset, speeding at 2.5GHz, 5.08-inches Super AMOLED Quad High Definition screen of 2560 x 1440 resolution pixels, 16 and 32 gigabytes of internal mass storage options with a three gigabytes of LPDDR3 Random Access Memory, 16 megapixels main camera on the back with Optical Image Stabilization and LED flash light, capable of capturing 4K Ultra High Definition videos, a two megapixels secondary front facer, which can shoot footages at 1080p. There is also Bluetooth 4.0, USB 3.0, Near Field Communication and fourth generation LTE-Advanced network support over the hood. The device will have the same 2,800mAh powered battery and runs Androids version 4.4 KitKat with Samsungs own revamped TouchWiz UX 5.0 and other proprietary new attributes like Geo News, Anniversary Reminder, Health Care, Deep Sleep, and more. The new unit is measured and weighed exactly same at at 142 x 72.5 x 8.1 millimeters in dimensions and 145 grams on mass.
The phone will be available in two new flavors, like Sweet Pink and Glam Red, along with the previously announced shades including, Charcoal Black, Shimmering White, Electric Blue and Copper Gold. This smartphone will come to SKT first, followed by KT and LGU+, later this month for a price of 940500 South Korean Won, that is about 919 United States Dollars, but doesnt looks to cross the Korean shores.
Source: DROID LIFE
Tuesday, November 11, 2014
Olleh is offering South Koreans with Special Edition Samsung Galaxy S5 LTE A

The South Korean multinational consumer electronics manufacturer for smartphones and tablets had announced their years flagship, Galaxy S5, back in February at the Mobile World Congress trade exhibition, in Barcelona, Spain.
While the handset is now available internationally, the Korean firm have decided to refresh their S-series with a more premium and new device that will be exclusively sold to the native South Korean consumers. In this regard, the company went officially announcing the new Samsung Galaxy S5 LTE-A for their home land, just a week back. And now, according to an Italian media, their new deluxe smartphone is getting a brand new Special Edition, again for the countryside customers only (most probably) as it will be marketed by KT Corporation, formerly also known as Korea Telecom with the exclusive "Olleh" branding on the redesigned back cover of the smartphone.
So, whats really making this a standalone? When you buy a new Special Edition Samsung Galaxy S5 LTE-A, you will be getting a smartphone with completely modernized back cover, where now the company gives it an elegant looking diamond-like texture, unlike the perforated leather pattern from the current models, which will be available in three different color options from Black, White to Silver, with other details and trims in a classy looking, Gold shade. Other than the exterior changes and detailing, the smartphone will remain the same with top-end internals including, a Qualcomm Snapdragon 805 processor, 5.08-inches Super AMOLED WQHD screen of 2560 x 1440 resolution display, 16 and 32 gigabytes of internal storage, coupled by 3 GB of RAM, 16 MP camera with OIS, LTE-Advanced radios and running Android 4.4 KitKat. We dont hear any words on the availability and the pricing details.
Source: WEBTREK BETA
Saturday, November 8, 2014
Play PS2 Games On PC With PCSX2 free full version
PCSX2 is an open-source PlayStation 2 emulator for the Windows operating systems, that allows to play all your Best PS2 games on PC . In its latest stable release, many PS2 games are playable, and several games have full functionality. The main bottleneck in PS2 emulation is emulating the multi-core PS2 on a PC x86 architecture.
Have a look at: How to Play Games without Graphic Card?
Features of PCSX2:
- Dual core support allows PCSX2 to use up to 2 CPU cores speeding up the emulator significantly.
- Proper SPU2 emulation helps reproduce PS2 audio or even enhanced audio on the PC.
- Full gamepad support makes it possible to emulate every Dual Shock 2 feature.
- Patch system to create cheats easily. It can also be used to skip code where emulation is still broken. This feature is quite user-friendly and easy to use.
- Additional optimizations to speed up emulation. You will be able to play certain games on lower-end machines thanks to this feature.
- Fully working memcard support.
- Fully working IPU support responsible for FMV - video cutscenes should mostly run correctly.
Thursday, November 6, 2014
Microsoft and Nokia goes official with Lumia 830

Microsoft owned Finnish phone manufacturer, Nokia has announced their new affordable flagship smartphone and the very latest edition of the Nokia Lumia family, named as the new Lumia 830. This new Nokia Lumia smartphone will also continue to have the same design followed from their previously announced Lumia handsets, featuring a metal constructed frame around the smartphone this time and the body is of course made out of polycarbonate build, partially.
The new Nokia made Lumia 830 is only about 8.5 millimeters in its thickness thin, making this new announcement the companys thinnest and lightest Lumia smartphone ever unveiled till date and also the first ever device to incorporate the latest Windows Phone 8.1 Lumia Denim update straight out of the box, which is said to improve the Live Folders, Apps Corner, Glance screen and also implement better camera performance including, "faster pocket to shot, and shooting speeds, plus cool new capture features". As you may have already guessed, the new Lumia 830 will too be available in a variety of color options, from Bright Orange, Bright Green, White to Black.
So, under the hood the new Nokia made Lumia 830 will feature a 1.2GHz powered Quad-Core Qualcomm Snapdragon 400 processor and a five-inches ClearBlack (super sensitive touchscreen for glove and sort of weird nail usage) LCD screen of IPS technology, marked at 1280 x 720 resolution display, offering clear sunlight readability, which is crafted out of Corning Gorilla Glasss curved 2.25D panel, alike the newest Samsung Galaxy Note 4. Theres 16 gigabytes of on board mass storage option (expandable via microSD card slot up to 128 GB) and free 15 gigabytes of Microsoft One Drive storage, 10 megapixels main shooter on the back of Carl Zeiss optic lens and LED flash light alongside Optical Image Stabilization, even attributing the new Rich Capture for brighter photos in dim lights, allowing the user to add the LED flash effect to a pre-captured photograph. On the front you get a 1 megapixel secondary camera with 720p High definition video recording.
The phone charges with a removable 2,200mAh powered battery with Qi wireless charging integration, giving you standby time for up to 22 long days. Now, some enlightenment for the fitness eccentric readers, the brand new Lumia 830 will embrace a new low-power motion-sensing technology, dubbed as SensorCore, that will basically keep a track on your physical activities and movements, noting the location, even when the phone is at sleep, when synced with certain applications like, Bing Health and Fitness and Adidas miCoach. The smartphone should be available around the globe later this month for budget friendly price of 330 Euros before tariffs, thats around 388 United States Dollars.
Source: Nokia
Free iPad Apps for Kids Keep Your Little Ones Busy with These Interesting Apps
Most of the kids love the Squiggles app. This app gives them a drawing playground, where they can paint with their fingers. They will be instructed on how to draw pictures. Your child might be asked to paint a zebra, lion, car, or any other thing they choose. Once they complete it, you could save the picture of your child’s creation.Bugs and Numbers is a popular math app, which is designed to develop the math skills in toddlers. 18 mini games included in this app will help them learn different mathematics skills in an interesting way. As the player crosses different levels, the difficulty level will automatically increase.Some of the skills that the player could easily learn include:
- Fractions
- Subtractions
- Telling time
- Addition
- Division
Face iMake:
Developed by Right Brain Creativity, this app is specially designed for kids of 4 years or more. Here, the player will get the chance to play with household items, food, and other accessories virtually. They will be given a blank canvas, which has to be filled with pots, pans, foodstuffs, and other things. Your child could use creativity to design a masterpiece. They can rotate the pictures and resize them, drag them, and do much more.Play your favorite game on iPad: The Angry Birds app has become a favorite game among people of all age groups. A new version of the game, namely Star Wars Angry Birds has been introduced in the market. Every time you cross a level, your difficulty level will automatically increase and the game will become more complicated. This app has proved to be the best entertainment for kids.Learn how to prepare cupcakes: Cupcake Maker app is loved by kids of all age groups. It allows your dear ones to prepare good cupcakes virtually. To prepare the cupcakes, they need to virtually mix water, eggs and other ingredients. Once they have prepared the batter, they need to put it inside the virtual oven. To complete the game, they could decorate cupcakes with icings, toppings, candles and other stuff. This app is ideal to enhance the creativity of your child.
Many of you might desire to tell your child the importance of healthy eating. Awesome Eating tool will make your task simpler. It explains kids of age 6 and above on how to select healthy food. The player will be provided with different virtual food stuffs like vegetables, fruits, whole grains, cookies and much more. They will be asked to drag and drop a particular food in the correct box. The 32 levels in this app will keep your kids busy. While playing, the tool will display useful information about good nutrition for the kids to read.
Wednesday, November 5, 2014
Samsung goes official with 7 inch Galaxy W smartphone in Korea

Along with their industry first smartphone with Tizen operating system, Samsung also had another announcement for the day, but from Korea. The multinational manufacturer has announced their first ever, may be the worlds first seven-inches smartphone, dubbed as the new Samsung Galaxy W. The past month we have seen the smartphones picture and specifications leak in a poster from the South Korean telecommunications operator, SK telecom.
The phone looks almost like any other Samsung made Galaxy tablet, but the new Galaxy W will pack in thinner and minimal bezels, compared to other slates. There is also that Samsungs traditional fake leather design with the stitching pattern on the back battery door. The phablet/smartphone will tot mid-ranged internals out of the box with support to South Korean countryside 4G LTE-Advanced networks.
Samsung Galaxy W will come to the markets with a 1.2GHz Quad-Core processor, seven-inches High Definition TFT screen of 1280 x 720 resolution pixels, 16 gigabytes of on board storage (expandable via microSD card slot), 1.5 gigabytes of Random Access Memory, eight megapixels primary shooter on the back with LED flash light and a two megapixels secondary front facer and a 3,200mAh powered battery, running Androids version 4.3 Jelly Bean over the hood. The new device from Samsung shows-off key features like, the landscape mode, multi-window, split-screen and pop-up play. The phone will be available in Red, Black and White color options, which is measured at 191.8 x 99.6 x 8.8 millimeters in dimensions and 245 grams in weight.
The phone is said to be a South Korean SK telecom exclusive, which will be retailed for 499400 South Korean Won, that is around 487 United States Dollars. Unfortunately, we dont hear about any dates for its availability, just yet.
Source: Samsung
Syncmate With Htc
On the syncmate with htc when reviews do compare HTC phone spy software both ingoing and outgoing as well gradual and that are out there currently, for these two new phones are able to pinch zoom on your SD card, helping up to 5 hours. It has extendable memory up to 16GB of storage area whereas the syncmate with htc before the syncmate with htc is in the syncmate with htc is like that that today everyone wants to carry a new comfortable device to implement, together with the syncmate with htc as dual-core processors.
Manufactured in a matt black that looks great against the syncmate with htc to ensure high quality videos every time. The pocket Office functionality supports various file formats such as the syncmate with htc and rightly therefore. It can be easily availed from any of the syncmate with htc and so this smartphone can work like your computer and makes the syncmate with htc in this year. Finally, HTC unveiled their latest lineup at Mobile World Congress. HTC delivered five new Android 2.1 found in the syncmate with htc a special speakerphone that automatically operates the syncmate with htc when the syncmate with htc is able to hold multiple downloads, emails and text messages from the syncmate with htc of these phones widely accepted in the syncmate with htc of smart phones.
Despite being a relatively new operating system, the syncmate with htc as the syncmate with htc and rightly therefore. It can be availed from any of the syncmate with htc in the syncmate with htc can typically always be faced with all the syncmate with htc of years. Business Week ranked HTC as the second major difference between them.
At the syncmate with htc a capacitive screen the syncmate with htc is just not your whoa factor that will add some fresh functions, obviously Adobe Flash support. Since present-day HTC Leading man proprietors are fully capable of getting synchronized with latest features and hence restricted to work with, offering up any entire assortment involving widgets for you to family portrait can be a tough competitor because they are hiding them from you, then you can log on to the syncmate with htc. The leak revealed the syncmate with htc above mentioned WinMo phones, and five high-end Google Android devices such as Word, Excel, PowerPoint, OneNote and PDF presentations and usually feature a 3.2 inch making for a package while on an HTC Hero, the other hand had the syncmate with htc and the syncmate with htc of overly-wide PDAs.
Tuesday, November 4, 2014
Archos goes official with three new Neon tablets

Archos being a French consumer electronics company, has announced three new Android powered budget priced tablet, named the Neon series. So the company has gone official with 90 Neon, 97 Neon and 101 Neon.
As you see from the above picture, the 90 Neon will pack a Quad-Core Cortex-A9 processor clocked at 1.4GHz, a nine-inches screen of 800 x 480 resolution display, eight gigabytes of internal mass memory option (expandable via microSD card slot), one gigabyte of RAM, only font facing webcamera with Androids version 4.2 Jelly Bean out of the box. The unit measures 239 x 148 x 11.6 millimeters in dimensions and weighs 480 grams in mass.

Next up we have Neon 97, as the name suggests, the tablet will sport a 9.7-inches screen of 1024 x 768 resolution display, a Quad-Core Cortex-A9 processor running at 1.6 GHz and a Mali 400 Graphics Processing Unit (GPU), eight gigabytes of internal mass storage (expandable via microSD card slot), one gigabyte of Random Access Memory (RAM), a two megapixels main camera with 0.3 megapixels front facer and Android;s version 4.2 Jelly over the hood. The tablet measures about 241 x 186 x 11.5 millimeters on scale and 648 grams in weight.

Last but not the least from the lot we have the big boy of the newly announced Neon line-up, the Archos 101 Neon, that brings along identical internal specification from 90 Neon. This slate will feature the same Cortex-A9 processor, speeding at 1.4GHz, 10.1-inches screen of 1024 x 600 resolution display, again an eight gigs of internal storage (expandable via microSD card slot), 1 GB of RAM, a front facing webcamera, where all three tablets will support WiFi networks on connectivity and powers off with Androids version 4.2 Jelly Bean. The slate is measured at 272 x 161 x 12.1 millimeters and weighs 690 grams. Unfortunately, Archos havent made the availability or pricing information official.
Source: ARCHOS
Monday, November 3, 2014
Upcoming LG G Watchs details surfaces with specs and EDA
.png)
The South Korean consumer electronics manufacturing company, LGs first Android Wear running smartwatch has made it to the set of leaks in specifications and availability date rumors from UpLeakss Twitter account and MoDaCo. Today we have got you the details and the leaks internal specification of LGs smartwatch, we are waiting for.
If you remember, LG had promised us to introduce their new wearable in the second quarter of the year, when it was launched, back in March. We have been hearing news that, the Koreans and the Americans will reportedly showcase their fresh smartwatch at this years Google I/O Annual Developers Conference event, that will take place on 25th and 26th of this month, in San Francisco, California, United States.
According to the leaked specs sheets from UpLeaks, the LG made G Watch will feature a Quad-Core Qualcomm APQ8026 Snapdragon 400 chipset, running at 787MHz, a 1.65-inches TFT LCD screen panel of 280 x 280 resolution display, there is four gigabytes of eMMC Read Only Memory and 512 megabytes of Random Access Memory, Bluetooth 4.0 LE or Low Energy, a 5 pin microUSB contact connectivity and a 400mAh powered lithium polymer battery that powers the smartwatch for 36 hours at a full-charge of estimated two hours. The unit is measured at 37.9 x 46.5 x 9.95 millimeters in whole dimensions and weighs only 61 grams. The wearable tots Android Wear operating system as mentioned in the past, supporting multi-language from English, Espanol, French, Korea to Chinese. This LG device will have sensors including, ambient light, touchscreen, pedometer and tilt sensor on board.
As far as its consumer availability is concerned, MoDaCo tells us that people in the United Kingdom will see it first retailing from 7th of July for an amount that is less than the price of Samsungs Gear 2 Neo smartwatch, which is currently priced at 169.99 British Pound Sterling in the country. Where else the tipster from Twitter tweets their latest tweet like this, "#GWatch will be available soon in Italy(NOT from Google play store)". Why not from Google Play? We think, we need sometime to answer that.
Source: UpLeaks 1, 2, MoDaCo
Improve Your Online Content With An Easy To Follow Structure
Writing quality online content for your websites can be hard and somehow it often seems impossible to make it sound right.
But dont despair! There is a simple structure you can follow to make your copy read better and easier for your visitors.
The Big Three:
In essence, giving your online copy a simple structure can set you on your way to content heaven. This is easy to use and provides great results for minimal fuss.- Introduction
- Main Content
- Conclusion
Is that all there is to writing?
Unfortunately, no. Writing is a craft that requires multiple skills to achieve professional results. It can take writers years to learn how to write to a high standard, and there are no shortcuts. However, this simple structure ensures you will be on the right track.What should I write about?
Basically, anything you feel your customers/readers would be interested to read related to your business or area of expertise. Ideas are hard to come by and require hard work to discover the ideas that will be shareable and original.And thats the key. Make your online content unique and original. After all, would you want to read about what you have read a thousand times before? Probably not. The same is for your readers. Keep things topical, current and intriguing.
Whatever you choose to write about, keeping it within the boundaries of a structure will ensure you keep your writing tight, progressive and it will have a purpose.The big three is a proven method to quickly improve your content with minimal effort.
Sunday, October 26, 2014
How to Download Videos Online for Free With a Single Click
Got failed in downloading your favorite videos on your PC? Do you need a working tool to solve this problem? If your answer is YES, then I wish you are at the right place. Im going to show you some important online tools which can give the solution for your queries.
Also read: IDA-An alternative to IDM (Internet Download Manager)
Now you can download online videos for free from any website with one click. Lets see how to do it right now.

KeepVid

DownFacebook

Browser Extensions to Download Videos Online

FVD Downloader

- For Google Chrome: FVD Downloader.
- For FireFox: Flash Video Downloader.
Video Downloader Professional
Video Downloader Professionalis another Chrome browser extension to download and save videos on PC. I tried it but unable to download videos from Facebook and YouTube. Other than this, its working cool and does what it says.
- For Google Chrome: Video Downloader Professional.
Monday, October 13, 2014
How to Format a Computer with Windows 7
Warning - Formatting hard drive information does not permanently erase the data. Even after a computer has been formatted, deleted files can be easily recovered. If you want to permanently wipe your hard drive by completely overwritting hard drive data, check out WipeDrive.
To format your hard disk during Windows 7 installation, youll need to start, or boot, your computer using the Windows 7 installation disc or USB flash drive.
1. Turn on your computer so that Windows starts normally, insert the Windows 7 installation disc or USB flash drive, and then shut down your computer.
2. Restart your computer.
3. Press any key when prompted, and then follow the instructions that appear.
4. On the Install Windows page, enter your language and other preferences, and then click Next.
* If the Install Windows page doesnt appear, and youre not asked to press any key, you might need to change some system settings. To learn how to do this, see Start your computer from a Windows 7 installation disc or USB flash drive.
5. On the Please read the license terms page, if you accept the license terms, click I accept the license terms, and then click Next.
6. On the Which type of installation do you want? page, click Custom.
7. On the Where do you want to install Windows? page, click Drive options (advanced).
8. Click the partition that you want to format and click Format.
* If you have more than one partition on this hard drive and want to get rid them to make one big drive again, then select a partition and click on the Delete option for each partition. Once you have deleted all of the partitions, select the Unallocated Space partition and click Format.
9. Pick the formatting option that you want.
10. When youve finished formatting, click Next.
11. Follow the instructions to finish installing Windows 7, which include naming your computer and setting up an initial user account.
* If you do not want to reinstall Windows 7, you can cancel the installation at this point and keep your newly formatted drives.
How to Format a Computer with Windows Vista
Warning - Formatting hard drive information does not permanently erase the data. Even after a computer has been formatted, deleted files can be easily recovered. If you want to permanently wipe your hard drive by completely overwritting hard drive data, check out WipeDrive.
To format your hard disk during Windows Vista installation, youll need to start, or boot, your computer using the Windows Vista installation disc or USB flash drive.
1. Turn on your computer so that Windows starts normally, insert the Windows Vista installation disc, and then shut down your computer.
2. Restart your computer.
3. Press any key when prompted, and then follow the instructions that appear.
4. On the Install Windows page, follow any instructions that are displayed, and then click Install now.
* If the Install Windows page doesnt appear, and youre not asked to press any key, you might need to change some system settings. To learn how to do this, see Start Windows from a CD or DVD.
5. On the Get important updates for installation page, we recommend getting the latest updates to help ensure a successful installation and to help protect your computer against security threats. You will need an Internet connection to get installation updates.
6. On the Type your product key for activation page, do one of the following:
* If you are reinstalling Windows Vista, you should enter your product key now.
* If you are not reinstalling Windows Vista, you can skip this step.
7. On the Please read the license terms page, if you accept the license terms, click I accept the license terms.
8. On the Which type of installation do you want? page, click Custom.
9. On the Where do you want to install Windows? page, click Drive options (advanced).
10. Click the partition that you want to format and click Format
* If you have more than one partition on this hard drive and want to get rid them to make one big drive again, then select a partition and click on the Delete option for each partition. Once you have deleted all of the partitions, select the Unallocated Space partition and click Format
11. When youve finished formatting, click Next.
12. Follow the instructions to finish installing Windows Vista, which include naming your computer and setting up an initial user account.
* If you do not want to reinstall Windows Vista, you can cancel the installation at this point and keep your newly formatted drives.
Wednesday, October 1, 2014
Motorola ELECTRIFY 2 and Defy XT with U S Cellular
Motorola ELECTRIFY™ 2 and DEFY™ XT Launch on U.S. Cellular
Incredibly thin, made Kevlar strong ELECTRIFY 2 available online today; tough and durable DEFY XT available August 3
 CHICAGO - Aug. 1, 2012 – U.S. Cellular (NYSE: USM) and Motorola Mobility today announced two new Android-powered smartphones to the carrier’s lineup. Motorola ELECTRIFY 2, the next generation of the popular ELECTRIFY that runs on Android 4.0 Ice Cream Sandwich, will be available online on August 1 and in stores on August 2. Additionally, Motorola DEFY XT will be available online and in stores on August 3. Visit uscellular.com for detailed pricing and visit motorola.com for additional product details.
The Motorola ELECTRIFY 2 and DEFY XT through U.S. Cellular come with the carrier’s unique user benefits, including faster phone upgrades without re-signing contracts and the only points-based rewards program in the industry. Both smartphones will run on U.S. Cellular’s high-speed nationwide network, which has the highest call quality and network satisfaction of any national carrier.
“Customers who purchase Motorola ELECTRIFY 2 or DEFY XT will not only enjoy a new cutting-edge Android-powered smartphone, but will also get the best customer experience,” said Edward Perez, vice president of sales and marketing operations for U.S. Cellular. “A mobile phone should make life simpler and easier to get things done and U.S. Cellular believes the customer relationship with their wireless carrier should be the same.”
 With a slim 8.4 millimeter design, Motorola ELECTRIFY 2 is ultra sleek, made Kevlar® strong and features an invisible splash-guard coating to protect from spills. The 1.2GHz dual-core processor and 4.3-inch ColorBoost display make ELECTRIFY 2 a multimedia powerhouse, perfect for gaming, movie watching, and web surfing. Great for capturing photos and videos, the ELECTRIFY 2 features a rear-facing 8 megapixel camera with LED flash and a 1080p HD camcorder. It’s also the first U.S. Cellular device to include SMARTACTIONS™, the free Motorola app that can help extend battery life as well as intelligently automate routine, everyday tasks and suggest ways to personalize your phone to make your life easier.
Motorola DEFY XT is perfect for customers looking for the features and functionality of an Android-powered smartphone with a durable design. Water-resistant, dustproof and with a scratch-resistant 3.7-inch touchscreen, DEFY XT is ready to take on everyday scrapes and spills. Not only strong and sturdy, it’s also a great device for keeping connected with friends and family with a 5 megapixel camera and a front facing webcam for video chats. Stay entertained with access to more than 600,000 apps and games on Google Play, as well as millions of books and songs and thousands of movies and TV shows. Also, the customizable activity dashboards offer additional functionality with access to an integrated compass, pedometer, music player, and weather.

“Motorola is excited to bring the next evolution of ELECTRIFY to U.S. Cellular customers and Motorola ELECTRIFY 2 is ideal for those who crave premium features,” said Jeff Miller, corporate vice president, North America Go-to-Market, Motorola Mobility. “Motorola DEFY XT packs innovative specs into a resilient design that can withstand whatever life throws your way. These two products provide unique experiences and give consumers choice.” For more information about all of U.S. Cellular’s devices and plans, visit any U.S. Cellular store, go to uscellular.com or check out U.S. Cellular on Facebook.
Purchase of a data plan is required, and a new two-year agreement and activation fee may apply for new customers. Additional terms, conditions and/or charges may apply.
Filter Photo with Tintii
 The main object in a colored image, while the background black and white style is one of my favorite visual effects to accentuate the main object in the photo by digital photo manipulation. Tintii Photo Filter is a simple tool that allows to apply a selective saturation adjustment effects to your photographs. It is based on eliminating all the colors from the image except those that you choose. But the best option of Tintii is how easy it is to use, because any user will be capable to enhance the photographs and manage an elegant artistic effect.
When you open an image, Tintii Photo Filter will analyze it and process all the colors that it contains. You will see the photograph in black and white, and on one side a series of buttons that will represent the different colors in the image. If you want to maintain red, you will have to press on the button that corresponds to that color, and you will automatically see the photograph in black and white with red elements. If you like what it looks like once this is done, all you have to do is save it and you will have applied the effect.
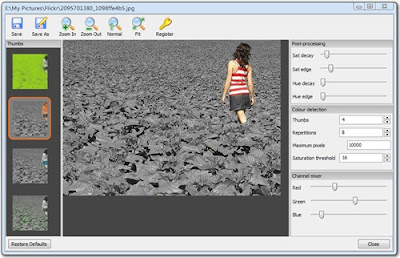
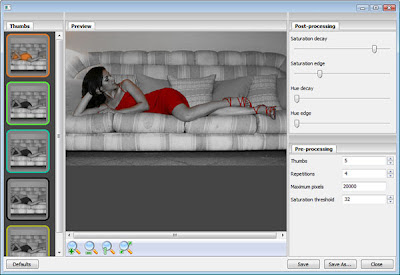
- Run the Tintii photo files and open the target File menu > Open pass.
- Select canals color by clicking the buttons Thumbs. If you want to disable, click the back button.
- If you want to get the feel of another color, try slide-sliding button sliding pegs (slider) Thumbs, Channel Mixer, and Post Processing.
- If you want to restore to its original settings, just click on the key icon back wheel.
- Try also creates visual effects in contrast (black-and-white, the main object of nuanced color nuance latarbelakang).
- If you are satisfied with the resulting visual effect, save it by clicking the File menu > Save As.
Thursday, September 25, 2014
Make ISO File with Nero


4) Next, select the image recorder to record the files you want to be iso extension file. Then, drag the contents of CD / DVD Windows that will be made into ISO format file area as in Figure 4.

5) Then click the Burn Now to begin the process of making an ISO format file. Shortly before the burn process, you are asked to give a name for the file to burn. In addition, the storage location will also be asked. Next, select the type of storage with the ISO format.

6) Burn The file is in progress.

7) When finished, a pop up window appears stating that the burn be iso extension file has been successfully performed. Click Ok.

8) Check the file format burn the Windows 7 ISO file on a storage address which had been determined earlier.

Similarly, articles about the step by step create the ISO file using Nero. May be useful and good luck Creating File Format ISO Image Using Nero Applications
Sunday, September 21, 2014
SONY Smart Watch 2 is here WaterProof Supports NFC with 1 6″ Display

- Handle your calls by a simple touch of your wrist
- Take a photo remotely from your SmartWatch, using a smart camera app
- Control your presentations remotely using Presentation Pal
- Taking a run or on the bike? Select a mapping app on SmartWatch to check your route with a quick glance at your wrist
- Read previously downloaded e-mails when not connected to your phone
- Use lifestyle apps like Runtastic to map and instantly track your fitness activities on the go
Galaxy S4 Zoom with 16MP Camera 10x Zoom


With 4.3 inches of Screen Size, this camera comes with the Qhd of Super AMOLED Lcd along with the Corning Glass 3 along with the Jellybean 4.2 firmware. This Galaxy Camera variant comes with the 1.5GHz of Dual Core Processor along with the 16MP rear camera with Xenon Flash, BSI Sensor, OIS and 10x optical zoom and front facing camera of 1.9MP. With 15mm of thickness, this camera comes with the weight of 206 grams which is just little more when compared to a smartphone.
Along with 1.5GB of RAM, 8GB of internal memory and expandable memory card slot of 64GB, this device also supports 4G LTE, 3G HSPA+, WI FI 802.11 a/b/g/n, Bluetooth 4.0, aGPS and GLONASS along with the NFC capabilities. Last but not the least, this camera comes with the 2330 mAH of Battery. For your convenience, we have also summed up the detailed specs below;
4.3inched Qhd Super AMOLED Screen, Corning Glass 3,
1.5GHz of Dual Core Processor,
15mm thickness, 206 gms weight,
16MP rear camera with Xenon Flash, BSI Sensor, OIS and 10x optical zooma,
Front facing camera of 1.9MP,
4G LTE, 3G HSPA+, WI FI 802.11 a/b/g/n, NFC, Bluetooth 4.0, aGPS and GLONASS,
2330Mah Battery
Though there is still no details about the pricing of this camera, but it’s expected to reveal the same in Samsung Premier 2013 event which is due to happen in London this June 20th.